


The trick to creating a PowerPoint presentation quickly is no secret at all. Slide after slide of black text on a white background – it may be the fastest way to make a presentation, but it’s also the most mind-numbing to sit through.
Many small business owners like you in Harrisburg, Lancaster, and York, PA, often find themselves overwhelmed when creating visually appealing PowerPoint presentations, grappling with the frustration of aligning objects, mastering data visualizations, and perfecting presentation designs. You likely aren’t a graphic designer and don’t want to spend forever putting together a presentation. But you still want something that looks professional.
Enter Microsoft 365—a powerful tool that can alleviate these concerns. With Microsoft 365, you can streamline your presentation process, ensuring that your slides captivate and communicate effectively. With that in mind, keep reading to learn 13 Microsoft PowerPoint hacks to help you save time, transform your presentations, and boost your confidence. Don’t have Microsoft 365? Schedule your consultation today to get it for your business!
1. Use the Slide Master


Have you ever found yourself going through a presentation one slide at a time to change fonts or add your logo? You can save yourself enormous amounts of time by using the Slide Master.
The Slide Master lets you set universal styles, layouts, and background graphics for your entire presentation. Use it to adjust fonts, font size, and colors, add logos to every page, or create and edit design themes. Customizing slide designs in PowerPoint allows you to tailor your presentations to your brand or specific project needs.
To access it, go to the View tab on your ribbon and click the Slide Master button.
On the left-hand side of your screen, you’ll see a list of all the slide templates in your presentation. The top thumbnail is your master slide. The thumbnails underneath it are each of your slide layouts.
When you make changes to the master slide, they will automatically transfer to the related layouts. You can also edit each design individually.
So, for example, if you want to insert custom graphics or add your company logo to the bottom of every slide, just insert it on the master slide, and it will automatically show up across your presentation. Then, you can move or change how it appears on individual layouts, like your Title layout.
Once you’re satisfied, exit the Slide Master view by clicking on “Close Master View” in the top ribbon, and your custom design will be applied to all slides using that layout. This Microsoft PowerPoint hack not only enhances the visual appeal of your presentation but also ensures consistency, making your content more engaging and professional.
Embracing these techniques can dramatically improve the effectiveness of your presentations, leaving a lasting impression on your audience.
2. Make Bulleted Lists a Breeze
The next item in our list of PowerPoint tips has to do with bullet points. Love them or hate them, bullet points happen in PowerPoint. Frequently. Here are a couple of ways to make bulleted lists easier to both create and understand.
Whenever you’re typing a bulleted list, use the Tab key to go down one bullet level. Use Shift + tab to go back up one level. And if your bullets are just getting messed up and not cooperating, don’t be afraid to select the entire list and toggle the Bullets button off.
Then, realign your text so it’s all on the left side, and then toggle the bullets back on again to reset everything to a top-level bullet. You can then adjust your bullet points to how you want them using the Tab key.
If you have a lot of bullets on one page, consider adding animation so points appear one at a time. Click on the Animations tab in the top ribbon to select the type of animation you want, from which direction you want the text to appear, and what triggers the animation.
For example, click on Fly-In as your animation type. Then, click on Effect Options and choose From Left Next, click on Trigger and hover over On Click of and select your content block. These steps will make your bullets appear one at a time from the left when you click on the slide.
This action will help your audience focus and avoid getting overwhelmed by too many bullets on the screen. How many is too many? Most people can’t remember more than seven, but in general, the fewer, the better.
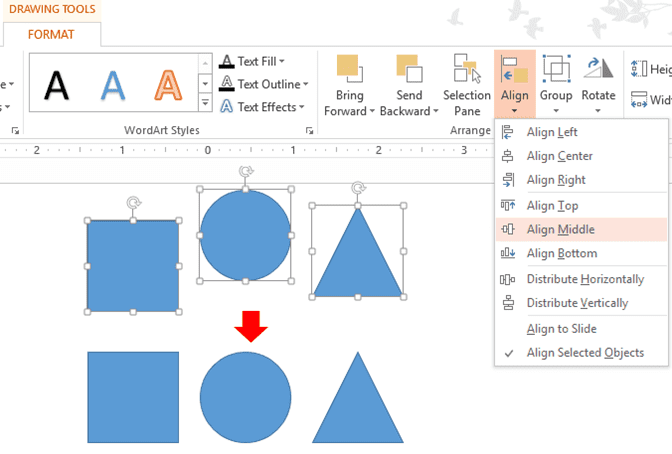
3. Easily Align Objects
Sometimes, PowerPoint can be finicky when it comes to getting text and objects to line up on the screen. Luckily, our next Microsoft PowerPoint hack will help with this issue. Use the Align tool to make your job easier.
First, click on the image, objects, or shapes you want to align. The Picture Format (it could also be the Graphics Format or Shape Format, depending on the objects) tab should appear. From there, click the Align drop-down button and select the option you want.
You can choose to align objects to each other or to the slide itself. Note that you can also distribute items horizontally or vertically, allowing for equal spacing between each object in a left-to-right or top-to-bottom direction.
Aligning objects on a PowerPoint slide can be time-consuming, especially when perfection is your goal. However, using the Microsoft PowerPoint hack for aligning objects can help improve your productivity. Additionally, using keyboard shortcuts like “Ctrl” with arrow keys can help nudge objects into place, saving even more time.
These PowerPoint tips not only enhance the visual appeal of your presentation but also ensure consistency across slides, making your message more impactful. Adopting these methods will significantly reduce frustration and increase your efficiency when designing slide layouts.
4. Duplicate Objects Instantly
When copying/pasting just isn’t fast enough because you are a busy small business owner, here’s how you can duplicate objects almost instantly.
- While holding down the Ctrl key, simply click and drag on the object to instantly duplicate it.
- You can also hold Ctrl + Shift to duplicate the object and move it in a straight line.
5. Copy Formatting with Shortcuts
Since PowerPoint is so visual, you often have multiple pieces of text or objects that you want to look similar.
Instead of having to Format Shape for each object, you may already know that you can use the Format Painter button to copy the look of one object to another. To do this faster, try using shortcuts for Windows computers:
- Select the object that’s formatted the way you want it and press Ctrl + Shift + C.
- Then select the object you want to paste the formatting to and press Ctrl + Shift + V
Voilà! Instant formatting!
6. Format Multiple Pictures at Once
If you have multiple pictures on a slide and you aren’t sure how to arrange them, here’s a quick PowerPoint tip to make them look great in a snap.
- Click the Picture Layout button and select a SmartArt layout for your pictures.
- Select multiple pictures by holding down Shift or Ctrl and clicking on each one.
- Go to the Picture Format tab that appears in your ribbon at the end.

PowerPoint will instantly resize and format your pictures, so they are all consistent. Plus, you can easily add text or captions to go along with them.
7. Use SmartArt to Make Bullets More Interesting

Struggling with long pages full of boring bulleted lists? Try making them more visual using SmartArt.
Highlight your list of bullet points, and on the Home tab, look for the Convert to SmartArt button. From the drop-down, select the layout you want or click on More SmartArt Graphics to see the complete list of options.
SmartArt adds color and visual interest to plain bullets. Some graphics even allow you to insert picture thumbnails next to your bullets.
This tip works better for more simplified data. Trying to convert complex data to SmartArt may require more advanced PowerPoint skills.
8. Create Custom Icons with the Merge Shapes Tool
Here’s a little-known Microsoft PowerPoint hack you can use to easily create custom shapes or punch text out from an object.
Select multiple shapes or text boxes that you’d like to modify. Go to the Shape Format tab in your ribbon. Click the Merge Shapes drop-down button and select from the following options:
- Union – joins multiple shapes into a single shape
- Combine – joins the shapes but creates empty space wherever they overlap
- Fragment – breaks the shapes into separate pieces based on where they overlap
- Intersect – removes everything except the overlapping section of the shapes
- Subtract – removes from the first-selected shape anything covered by other shapes

9. Hide Your Hyperlinks
You may want to link to external sources or media during a presentation, but you don’t always want bright blue hyperlink text in the middle of your slide.
One option is to turn an object into a hyperlink. Simply select any object, go to the Insert tab, and click the Link button. Then, just enter a URL in the Address box and click OK. When you’re in presentation mode, you’ll be able to click on the object to open the link.
If you want to hyperlink text but you don’t want to change the formatting, you can create an invisible box as a hyperlink. On the Insert tab, use the Shapes button to create a rectangle. Select the rectangle on your slide, and under the Shape Format tab, set the Shape Fill to No Fill and the Shape Outline to No Outline. Then, create a hyperlink in the same way as above, and place the invisible box over the text you want to use as a link.
10. Enhance Your Presentation with Fade Transitions

Make your entire presentation feel a little more professional in five seconds flat with this Microsoft PowerPoint hack.
In the preview pane on the left-hand side of your screen, select the thumbnails for all of your slides by clicking on one slide thumbnail and holding down CTRL + A. Go to the Transitions tab and select the Fade transition.
Setting custom intro animations for each slide is time-consuming and often distracting, especially if you have remote workers viewing the slideshow during a video conference call. This understated animation makes transitions smoother and more appealing without going overboard.
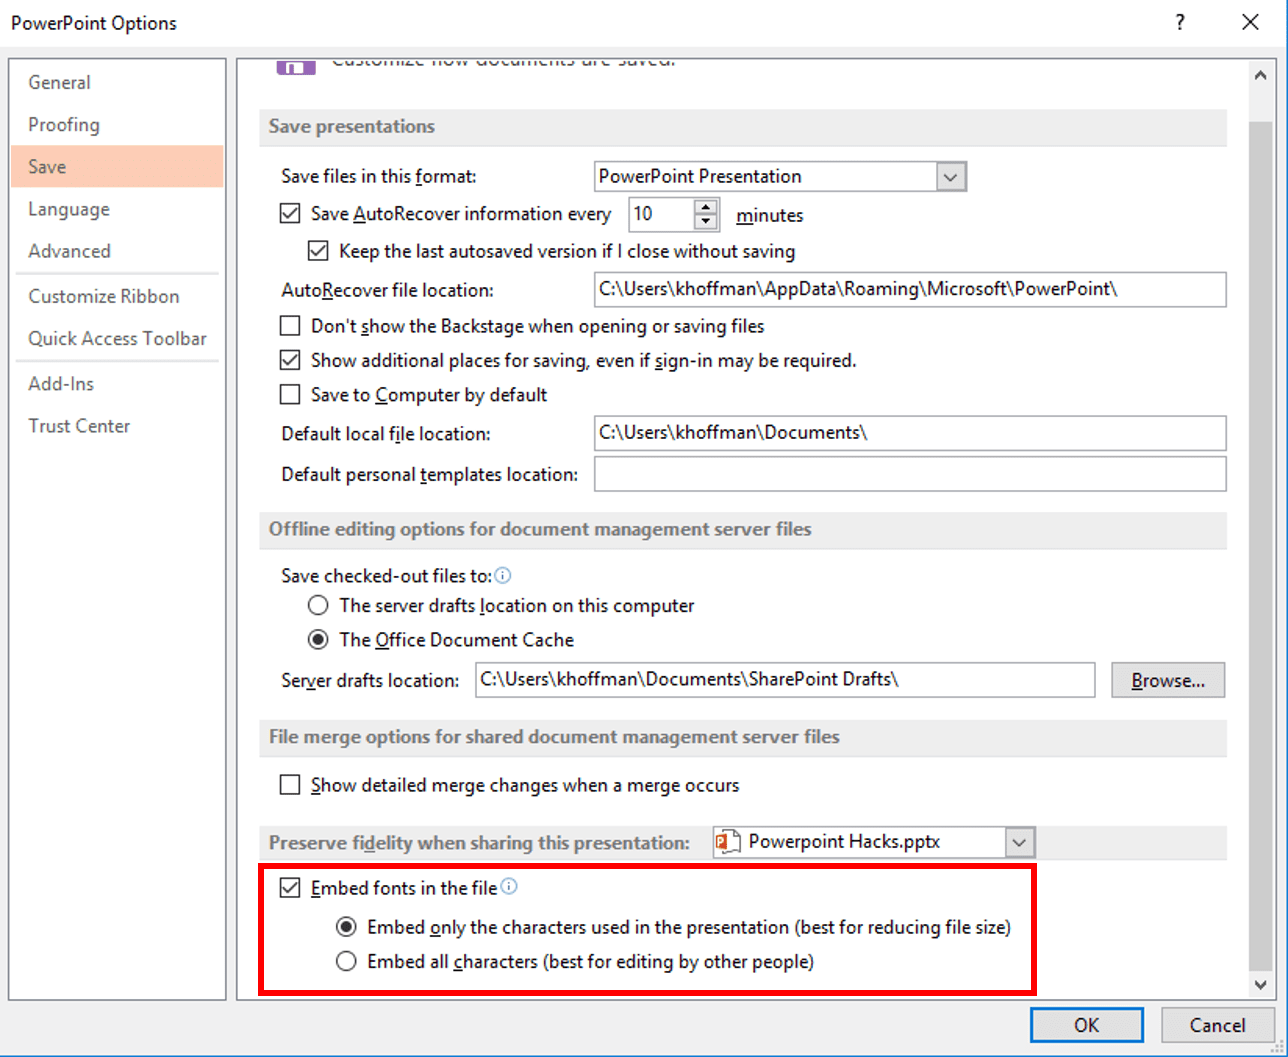
11. Embed Your Fonts
Here’s a familiar situation: your PowerPoint looks perfect on your computer, but as soon as you try to present it someplace else, your text is messed up, and nothing looks right. Fonts are often the culprits because other people might not have the same typefaces installed that you do.
To avoid this problem, you can embed your fonts within your presentation so your text will display the same way on every computer. Go to File –> Options. Look for Save options on the left-hand menu, and click the checkbox to Embed fonts in the file. To minimize your presentation’s file size, keep the radio dial at Embed only the characters used in the presentation.
12. Simplify Presenting With Shortcuts
Presenting can be nerve-wracking enough without having to worry about navigating your presentation. Make presentation day a breeze with these helpful keyboard shortcuts.
- F5 – Start the presentation from the beginning
- Shift + F5 – Start the presentation from the current slide
- Esc – Exit the slide presentation
While you’re presenting, here are some useful shortcuts to help keep your audience focused:
- B – Turn the whole screen black. Press it again to return to the presentation.
- W – Turn the whole screen white. Press it again to return to the presentation.
- Slide # + Enter – Move to any slide.
Turning the screen black or white is a great trick to get your audience focused back on you if you find their attention wandering. It’s always great to be able to navigate quickly to other slides, especially during a Q&A session where your audience may reference earlier parts of your presentation.
13. Use Presenter Mode
Last but not least, here’s the ultimate hack for speakers: Presenter Mode.
If you’re not familiar with it, Presenter Mode allows you to view the speaker notes for your presentation on your own monitor (like a laptop) while displaying your clean slides to your audience on a separate monitor or projector. It also shows you the next slide in the deck and keeps a running timer so you can easily stay on track throughout your presentation.
To enable Presenter mode, go to the Slide Show tab and click the checkbox for Use Presenter View.

How Does Poor Presentation Design Affect Your Business?
Poor presentation design can significantly impact your business by undermining your message and reducing audience engagement. When slides are cluttered, text-heavy, or lack visual unity, they can distract your audience, causing them to lose focus on the content you’re presenting. Variations in fonts, colors, and layouts can make your presentation seem unprofessional, negatively affecting your credibility and the perception of your brand.
Additionally, a poorly designed presentation might fail to convey critical information effectively, leading to misunderstandings or missed opportunities. This situation can be particularly damaging in client meetings or pitches, where clarity and persuasion are paramount.
Investing time by learning these time-saving Microsoft PowerPoint hacks ensures your message is communicated clearly and professionally, helping to build trust and engagement with your audience. By leveraging tools like Microsoft PowerPoint and adopting best practices in slide design, you can enhance your presentations, ultimately supporting your business objectives and growth.
What Features Does Microsoft 365 Offer for PowerPoint?
You’re missing out if you’re not using Microsoft 365 to access PowerPoint! Microsoft 365 enhances PowerPoint with a suite of features designed to elevate your presentations. One standout tool is the Quick Access Toolbar, which allows you to customize and access frequently used commands with ease.
The Designer feature offers automated suggestions to improve slide aesthetics, saving you time on layout decisions. PowerPoint’s integration with OneDrive enables seamless collaboration, allowing multiple users to work on a presentation simultaneously. This ability ensures that updates are synchronized in real time, making teamwork more efficient.
Additionally, Microsoft 365 provides advanced data visualization options, such as charts and graphs, to help convey complex information clearly. The Rehearse with Coach tool in the Slideshow tab offers real-time feedback to refine your presentation skills, helping you deliver with confidence. These features, combined with robust security and accessibility options, make Microsoft 365 an indispensable tool for creating effective and visually compelling presentations.
Ready to Put These Microsoft PowerPoint Hacks to Good Use?
Now that you’re equipped with essential Microsoft PowerPoint hacks, it’s time to apply them and transform your presentations. Start by incorporating these PowerPoint tips into your next project to streamline your workflow and enhance your slides’ visual appeal.
Looking for more Microsoft Office hacks? Check out our other articles for time-saving tips:
As you gain confidence, experiment with custom slide designs and explore the advanced features Microsoft 365 offers. Remember, the goal is not just to make your presentations prettier but also more effective in communicating your message. Consistency, clarity, and engagement are key.
Whether you’re presenting to clients, colleagues, or stakeholders, these refinements can make a significant difference in the impact of your presentation. If you’re ready to take your skills to the next level, consider scheduling a consultation with a trusted IT partner like us who can assist you in maximizing your use of Microsoft 365 and ensuring your technology supports your business goals. Take the first step toward more professional and compelling presentations today.